¿Why Shoulders - Exercise Guide for a Glorious Look!

 |
|
What's On
|
 - Training Guides for Print Out - Training Guides for Print Out
- General Info
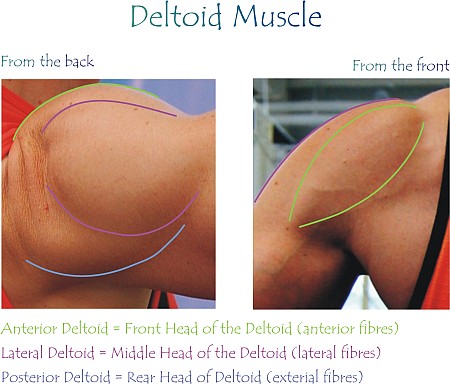
- Deltoid Front Head
- Deltoid Middle Head
- Deltoid Rear Head
|
|
 |
Why Shoulders?
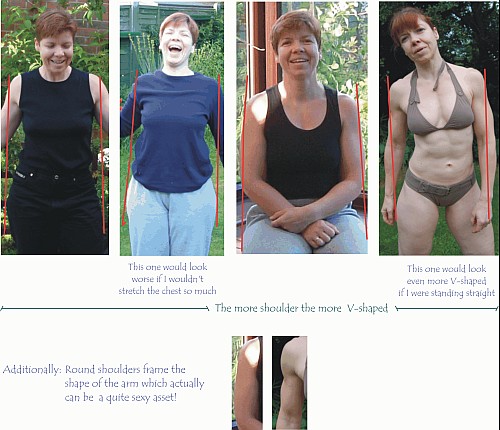
Whether you are an apple or a pear shape: Shoulders build the visual framework for the whole body.
I'm a pear and even in the snapshots below it becomes clear that the chubbier I got my bum/leg area got wider than the shoulders. Additionally the upper arm starts to gather fat which later leads to the dreaded bingo-wings. That adds to the impression of an 'A' shape, with the shoulders hanging a bit and the waist not as defined, although I always was rather slim around the middle.
Well knowing that the work on the lower bit would need time it was clear to me that I would have to put the focus on the shoulders to balance the bottom bit quickly. This would make me feel better instantly while giving me time to catch up with the legs.
From the last image one can see that there is still quite some work to be done on those - and of course this is not the worst of pictures - believe me! There IS WORK still to be done.
However, back to the shoulders. If you are an apple shape you might be afraid to look even bulkier in the top bit: Go for shoulder exercises nevertheless. You might have to put the focus of the training on some leg and bum exercise, but don't neglect the shoulders. When you are top heavy it is likely that you have big arms as well, and the shoulder exercises will help to frame your arms and neck nicely. In combination with good arm exercises you will be able to bring some definition into the upper body what will quickly give you a more streamlined appearance.
Exercise Guide for a Glorious Look!
Due to the fact that the shoulders are actually a group of 3 muscles it needs 3 exercises which are equally important to build nice round shoulders. There are a lot of exercises to choose from and if would ask three different people about it you will get 5 different answers - it has a lot to do with individual likings.
I had periods where I did different exercises from what I'm doing now. Sometimes I got bored, and one time I had an injury (fell on my wrist - stupid me) and couldn't hold the dumbbells.
Altogether it is rather beneficial to change from time to time because every exercise targets the muscle slightly differently. Change will make the muscle more alert again. Additionally it's a good way to work around occupied stations in the gym. So it is good to know about alternative exercises.
The table below gives you an overview and briefly describes the advantages and disadvantages of each exercise. More details you will find in the exercise description linked to the respective entry and you will find a PDF link which provides a printable version of the exercise description.
The list doesn't cover gym machines. Although I usually prefer free weights - I have good experience with most of the machines. There are a few that don't fit a ladies proportions but the shoulder machines were all very good. So if your gym has one get an instructor to explain it to you - every machine is working a bit differently and will need some explaining an testing.
I sometimes do free weights for some weeks and then I go to the machine for a while. Usually I will get some muscle ache after the first time after change what tells me that it was about time to tweak the muscle a bit differently.
Which Ones are Your Favourite Exercises?
Here is an overview of the advantages and disadvantages of the different exercises. Some of them I just don't like and never do them, but you might feel differently, some of the not so preferred ones I do whenever my favourite station is occupied, or because I just need a change. But usually I will go back to the 'Winners' for the good reasons listed below.
Whenever you lift a weight some part of your body has to counteract the movement. For example: If you lift a shopping bag with your right hand you automatically will bend to the left and maybe lift your left arm a bit to balance it out.
You will always want to try to choose your exercise in a way that the weakest of the muscles which counteract the original movement is the biggest ones possible. It will exhaust less quickly and hence you can put all the effort into the muscle that you actually want to train. Additionally you can keep a good posture more easily what helps to avoid injuries.
| Front Head
- Seated Dumbbell Press: Winner
- Weakest counteracting muscle: None, fully supported by bench
- Direction of force: Inline with the body down to the bench
- Comment: Most of the shoulder machines use this approach
- Cable Front Raise (Lift): Winner
- Weakest counteracting muscle: Buttocks, legs
- Direction of force: Inline with the body down to both feet
- Dumbbell Front Raise (Lift)
- Weakest counteracting muscle: Lower back
- Direction of force: In front of the body
- Comment: Although the movement is very similar to the Cable front raise the size of the weights gets in the way for optimal posture.
- Seated Barbell Press
- Weakest counteracting muscle: Lower back
- Direction of force: Inline with the body down to the bench
- Drawback: Although sitting on a bench the back support is missing (some people do it with back rest, but then the weight has to be very small)
Standing Barbell Press
- Weakest counteracting muscle: Lower back
- Direction of force: Inline with the body down tothe ground
- Comment: Usually done with barbell as part of weightlifting training
- Drawback: It needs a lot of technique to do it properly without risking injuries.
|
|
Middle Head
- Cable Side Lift - one arm: Winner
- Weakest counteracting muscle: Buttocks, legs
- Direction of force: Inline with the body down to the opposite foot
- Dumbbell Side Lift - two arm: Winner
- Weakest counteracting muscle: Buttocks, legs
- Direction of force: Inline with the body down to both feet
Cable Side Lift - two arm, inline
- Weakest counteracting muscle: Buttocks, legs
- Direction of force: better than one arm as both feet are used for balance
- Comment: Cables running very close to the body
- Drawback: Cable scratches along the body, cable poles have to be wide enough apart to fit inbetween.
Cable Side Lift - two arm, bow
- Weakest counteracting muscle: Lower back
- Direction of force: In front of the body
- Comment: Slightly stepping back and bending a tad forward
- Drawback: Involvement of smaller muscle
|
|
Back Head
- Cable Reverse (back) Fly, upright: Winner
- Weakest counteracting muscle: Buttocks, legs
- Direction of force: Inline with the body down to both feet
- Dumbbell Reverse (back) Fly, seated: Worthwhile Trying
- Weakest counteracting muscle: Back + tummy
- Direction of force: In front of the body
- Comment: Could be a winner as the upper body is lying bent on top of the legs and hence is fully supported. However this posture restricts the breathing a bit, what makes it second best to the 'cable reverse fly, upright'.
- Drawback: Restricted breathing
- Cable Reverse (back) Fly, standing bent
- Weakest counteracting muscle: Lower back
- Direction of force: In front of the body
- Comment: Better than 'Dumbbell reverse fly, standing bent'
- Drawback: Involvement of smaller muscle.
Cable Reverse (back) Fly, upright - one arm
- Weakest counteracting muscle: waist
- Direction of force: Inline with the body down to the opposite foot
- Drawback: It's hard to keep the posture. As the movement goes back and forth there is easily a twist in the waist applied.
- Dumbbell Reverse (back) Fly, standing bent: Not as good as cable
- Weakest counteracting muscle: Lower back
- Direction of force: In front of the body
- Comment: Not as good as 'Cable Reverse Fly, standing bent'. An option if no cable or bench available.
- Drawback: Involvement of smaller muscle. Additionally the dumbbells need more balancing than the cables.
|
Numbers, Numbers, and a few things more!
It's time to get started now. So here is the number of sets and repetitions and whatever else you need to know.
| Muscle size: |
Shoulders are small muscles hence they need higher number of repetitions. |
| Number of exercises: |
| 5 |
|
2 front head
2 middle head
1 rear head |
|
| Order: |
Work from front to back |
| Importance: |
|
high
|
|
front head
|
|
high
|
|
middle head
|
|
high
|
|
rear head
|
If you are short of time and you could skip the 2nd and the 4th exercise, training each muscle head with just one exercise |
| Number of sets: |
| 11 |
|
1 warm-up using Dumbbell Press
2 Dumbbell Press
2 Neck Press
2 Dumbbell Fly seated
2 Cable Fly (lift) one arm
2 Cable Reverse Fly |
|
| Number of repetitions: |
| 10 |
|
for warm-up last repetition is still easy to do |
| 9 - 12 |
|
in every other set. About 70-80% of max weight. Movement is like in slow motion. See videos at the Bloody Hell Blog. The last repetition in every set should feel like you couldn't possibly lift the weight one more time. After every set review your performance and adjust the weight accordingly. If you could do 12 stay with the same weight - you surely can do 9 in the next set. If you did 9 then reduce weight. |
This applies for beginners as well as advanced. And these numbers apply for each of the five exercises.
|
| Duration: |
20 - 30 min |
| Breathing: |
| weight up |
|
breath out through mouth |
| weight down |
|
breath in through nose |
|
| Progress: |
| 15 |
|
is absolute cut off. When you got as strong as 15 reps in a standard set then raise the weight for the next set of this exercise. Make a note in your training diary to start with a higher weight the next time you do shoulders. |
|
| Train together with: |
Tummy
Legs
Arms |
| DON'T train with: |
Chest
Back
|
From Start to UP and Down again!
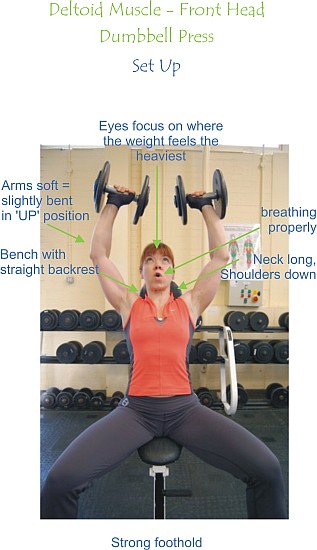
Take up your weights as described in 'Lucky Number - Handling Weights' keeping your back nice and straight, and sit down on your bench resting the weight on your thighs.
Breathe in and lift the weight into position 'A'.
Balance it out until it is almost lined up as if you were holding a bar. Breathe comfortably in and out as you please until you feel comfortable and stable.
- The little tilt towards the inside is okay. This is one reason why I prefer the dumbbells to 'Shoulder Press with barbell' - the wrist position is more comfortable. It needs a bit more balancing and hence you can't use as big weights, though.
Look up to the point in the air where you want the weight to go to (B),
Take a deep breath in and press up the weight while breathing out through the mouth.
- Don't lift higher than B (in fact this is almost a bit too high already)
- The idea is that the weight should hover above the shoulder (C), everything other would involve other muscles to help to get it there and you want to use the shoulders as isolated as possible.
- If you would stretch your arm straight up like in 'D' you would have the weight above the shoulder as well, but it would be resting comfortably there. In Shoulder-Arm-Weight setup 'C' the centre of gravity is not above the shoulder, but a bit outside. So there is still balancing work to do and the shoulder has to keep the tension. In setup 'D' the centre of gravity would be above the shoulder and the whole thing would be nicely balanced, giving the shoulder a rest - what we don't want to happen.
That counts as 1 repetition.
Breathe in through the nose while bringing the weight back down. Do this very controlled and don't let the weight 'fall'. Keep the tension even in the down position and then press up again while breathing out through the mouth counting the next repetition.
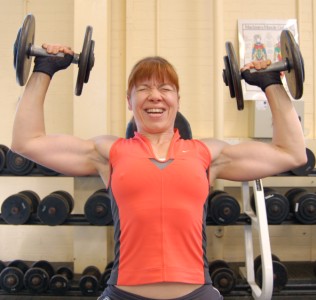
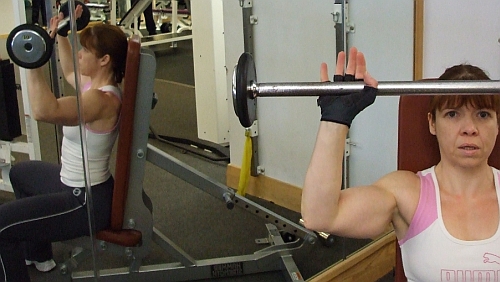
Now it hurts!
I'm not faking it here!
I deliberate finished myself off in this exercise to give you an impression what you are supposed to achieve - for the rest of the photo shoot I took it a bit easier.
For some of you this might look odd, but if it is not getting hard it is a bit of a waste of time. There will be a natural limit what I think I have almost reached meaning that I won't be able to increase the weights any further. But nevertheless I will go to the very end of each set to sort of stay on a maintenance level.
And this grimace has an additional advantage - It is the best face training you can get. I somewhere heard about this advice to grimace for 5 minutes in the morning in front of the mirror to keep your face wrinkle free and smooth. Well, I saved at least those 5 minutes. But be honest: Where else can you get this kind of muscle tension in the face without having the people with a straightjacket coming after you!
 |
|
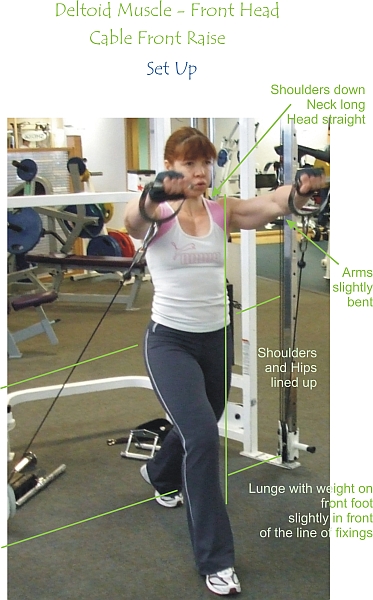
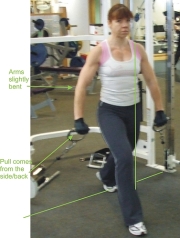
Here the movement goes towards the front so a 'lunge' posture gives a lot of stability while the cables support the stability towards the sides.
Although the movement comes from the rolls those are fixed. This is a much more controlled setup compared to the 'Dumbbell Front Raise'.
Because the pull comes from the side/back and the handles are small, the legs don't get into the way. Again: Compared to the 'Dumbbell Front Raise' where the weight has to be kept in front of the legs, a 'lunge' wouldn't be an option (see as well: Handling Weights).
|
Grab the handles of the cable which is fixed on floor level.
Position yourself in the middle between the fixings of the cable slightly behind. Then with one foot take a step forward and feel your weight on the front foot by shifting the hips forward as well. Don't twist the hips/waist. The whole pelvis is straight and upright as if you would have your feet together and the shoulders are in the same line.
Hold the tension in the neck shoulders and arm by having the arms slightly bent.
Take a deep breath in through the nose, build up the tension in the upper body, clench the buttocks and raise the weight until the arms are parallel to the floor while breathing out through the mouth.
This counts as 1 repetition.
Let the weight down controlled and slowly.
 |
|
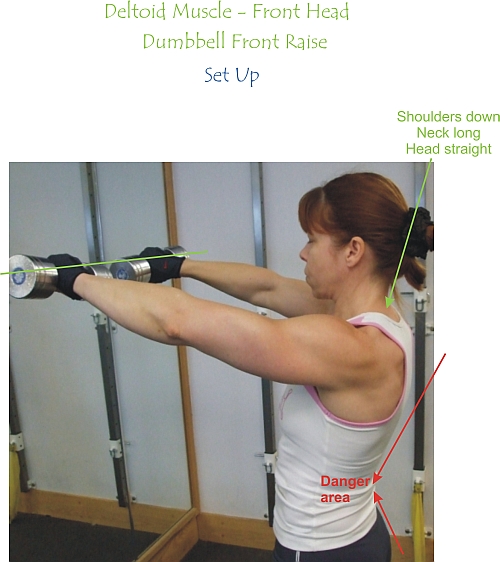
This exercise can be performed with a barbell as well, and actually is not really useful for heavy weights. It belongs more into the 'BodyPump' Aerobic area where a lot of repetitions with small weights are done.
However I sometimes see it done in the gym and hence feel it important to include it into the collection of exercises.
During the movement the centre of gravity of the body-weight setup is moving far into the front of the body. Do NOT counter this excess weight by bending back.
In order to do it with heavy weights, it needs strong back muscles and buttocks.
I personally find 'Cable Front Raise' much more beneficial and less risky.
|
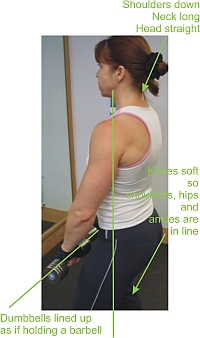
Take the dumbbells, hold them in front of your thighs, and line them up as if holding a barbell.
Shoulders are down and back, knees soft, feet shoulder wide apart, arms slightly bent.
Concentrate on the weight while keeping the head straight and the neck long.
Take a deep breath in through the nose, increase the tension in your upper body, clench the buttocks and lift the weight to the front while breathing out through the mouth.
This counts as 1 repetition.
Keep the back straight and the buttocks clenched at all times, and keep the tension during the 'down' movement as usual.
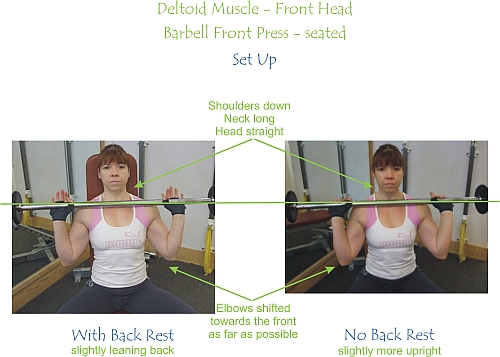
I see this exercise rather often done with a back rest and I have to say I don't see the benefit of it compared to the 'Dumbbell Press'. The head gets in the way of the bar and has nowhere to go due to the back rest. So the bar will always have to be pushed 'forward' as well as 'up'.
This exercise is supposed to be done with heavy weights what is not possible when the weight has to be pushed away from the body and then needs catching again.
Only if the weight is small enough the arm and back muscles will be able to support the weight. There are gym machines where the seat is adjusted a bit more leaning backwards, and the bar or the weight is guided by rails or handles. That makes sense and is safe. But at the same time it is a little bit a different exercise.
The seated barbell press, as well as the standing barbell press, are part of the weightlifting training where the weight is either lifted in
- the 'snatch' (weight goes from the ground up above the head in one go),
- the 'clean and jerk' (weight is lifted up to the chest and then by jumping under the bar lifted above the head), or
- the 'clean and press' (lifted to the chest and then pressed up above the head). The 'barbell press' actually is the second phase of the 'clean and press' which is not an Olympic discipline anymore as it is tricky to do and hence to judge.
The movements in the weightlifting sport are different from Bodybuilding and the purpose is different. In Bodybuilding the body stays as put as possible and only the weight moves several times in order to isolate the muscle and make it tired and thus grow.
In weightlifting it is about lifting as much weight as possible only once. The weight gets yanked up to make it fly and then the weightlifter moves under the weight to catch it and move it further. Obviously the closer to the body the weight is moved the easier to get under and to catch it. It is all about using the momentum of the moving weight.
In the above picture the weight is so far to the front in order to avoid the head to be hit that it is really tricky to move it back above the head again, where it has to end up in order to be held stable.
 |
|
This picture series starts at the bottom. It is a bit tricky to show as the bottom 3 pictures happen very fast, and I'm not actually very good in it as I'm not a weightlifter.
In the bottom picture I already gave the bar a push upwards.
In the setup photo I mentioned that the elbows have to point forward. This is in order to push up and not to the front. Another way of looking at it is to 'push the bar up' while 'pushing myself back' using the force of inertia of the weight.
There is the same distance between head and bar like in the above photo, but it is created differently.
- Above the weight moves forward and would fly on if I were not able to pull it back
- Here the weight flies up, and at the same time I move myself out of the way, and all I have to do is to move back as soon as the bar has passed my head. No need to pull, just guiding.
So during the next two pictures the bar basically flies guided by my arms. As soon as it is above my head I keep pushing it up the rest of the way while flipping the body forward under the bar what gives it a slight back movement, so it slips into a position above the shoulders behind the head where it is stable.
The way back works as follows:
I will flip my body back and let the weight fall, pushing the elbows forward to fold in the arms, and stretching the chest up to catch the bar. Once it has landed the head comes forward again.
As you can see: This exercise has a lot to do with throwing, flying, catching. All things which I usually mention as strictly forbidden. This exercise needs a lot of technique and I wouldn't even know the secrets of the weightlifting trade.
If you are really interested in weightlifting I would suggest for you to go to a weightlifting club and to learn it from scratch. Gym staff is not necessarily the people who would know how to do it properly, as they mainly do Bodybuilding on machines and a lot of them have very little experience with free weights altogether.
|
|